|
I'm two days late with this post, and I fear I'm disappointing as a KAL hostess. I do hope you'll forgive my delinquency. By now, we've gathered our supplies and swatched along with Mari. Now we're ready for the fun part- Casting-on! We'll start by knitting the sleeves of the Channel Cardigan. Knitters, you are free to choose any method of casting-on you prefer. However, the pattern recommends a tubular cast-on. For those unfamiliar with this casting-on method, I've attempted a photo tutorial to help us along.  Before we begin, we will need to gather: waste yarn, working yarn, our size 'C' needles (suggested US 4), a stitch marker and a cable needle (optional). We will be knitting in the round, so choose your preferred method for small circumference knitting (dpn vs. circular). 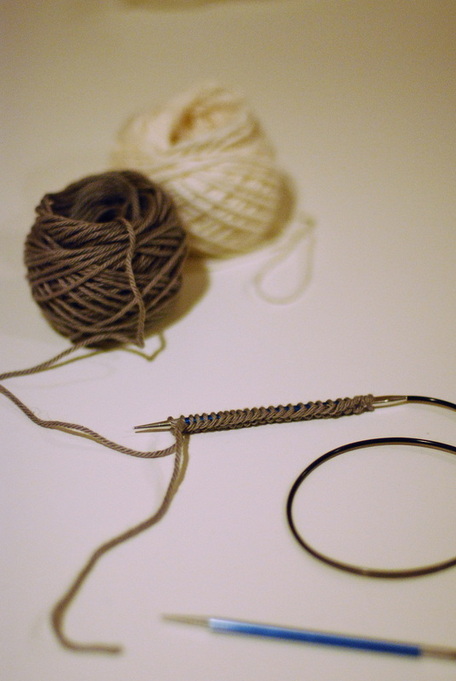 To start, we will cast on half the total number of stitches we want for our cuff plus one additional stitch (50% + 1sts.). The total cuff stitch counts are already provided in the pattern: 48(52,5,52,56,60). To obtain the correct number of stitches using a tubular cast-on, you should cast-on 25(27,27,29,31) sts., accordingly. You can choose any casting-on method for this portion. I've used a long tail cast-on. Once you've completed your cast-on, you can cut your waste yarn and set it aside. 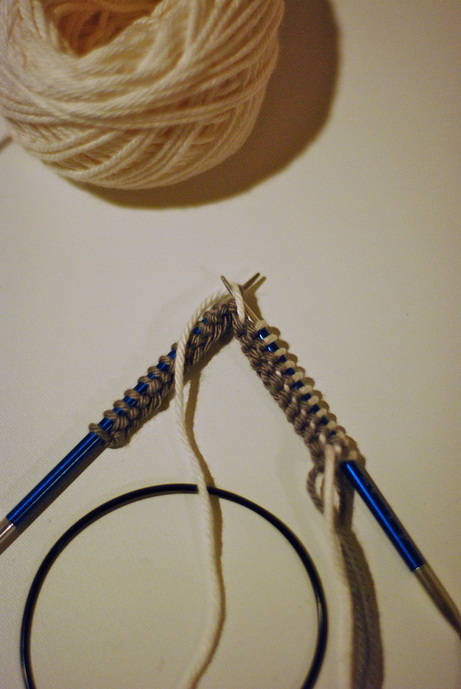 Now, using your working yarn, from the wrong side, purl to the end of the row. This row is our foundation. Row 1.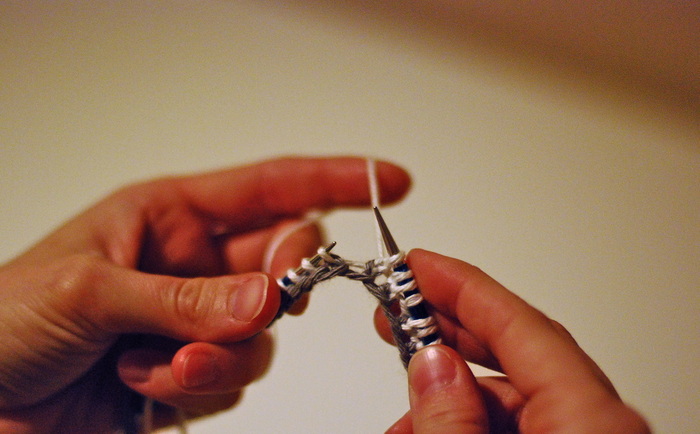 Turn your work so that you are ready to work a row from the right side. We will now double the total number of stitches on our needle by increasing into the bar between each stitch. To start, knit the first stitch on your needle. As you move this stitch from your left needle to the right, you will see there is a bar between the two stitches. In the above photo, this is the straight, white (working yarn) between the stitch on my right needle and the stitch on the left needle. 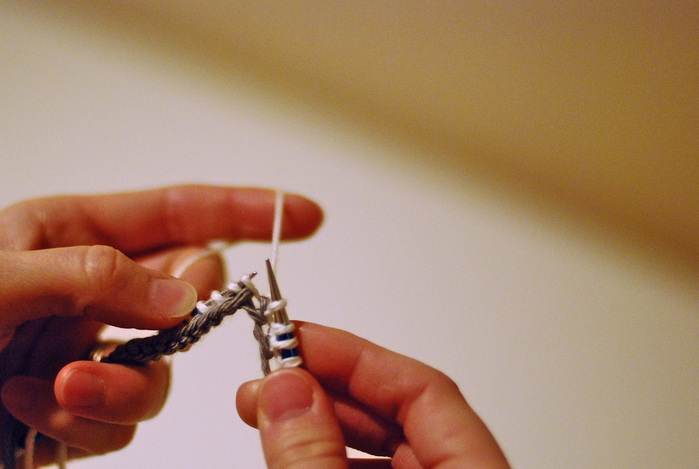 To increase, pick-up the that bar between stitches by Inserting the tip of your left needle under the bar, from the front side of your work.  Now, bring your working yarn to the front of your work and purl the bar, moving this new stitch from the left needle to the right needle. One stitch increased. Continuing in this manner, until you reach the last stitch of the row. Then, slip the last stitch purlwise, with the working yarn behind the stitch. Round 2.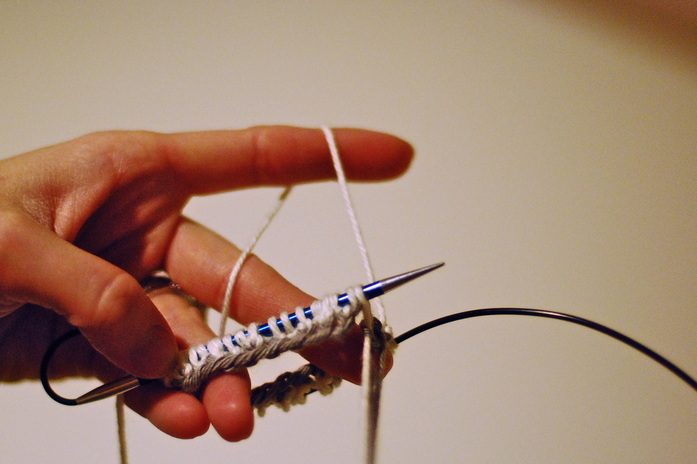 We will now prepare to knit in the round. Divide your stitches appropriately, and move the last stitch of the round (the stitch we slipped in the previous row) to the left needle. Place a marker to note the beginning of the round.  With your working yarn in back of your work, slip the first two stitches from the left needle to the right needle. 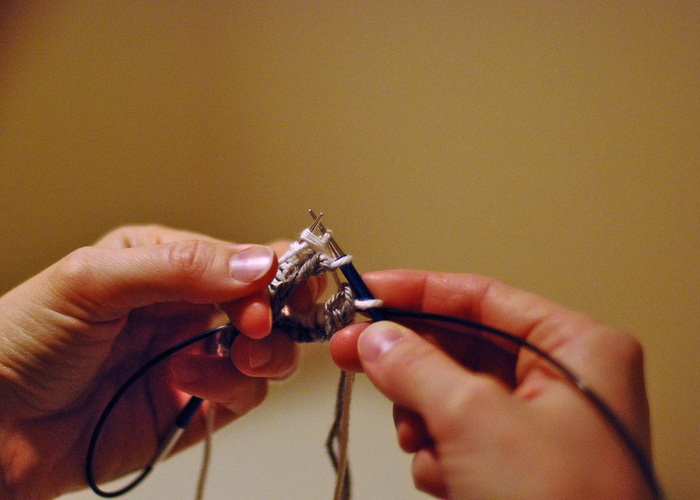 Bring your working yarn to the front of your work and purl the next stitch in the round. 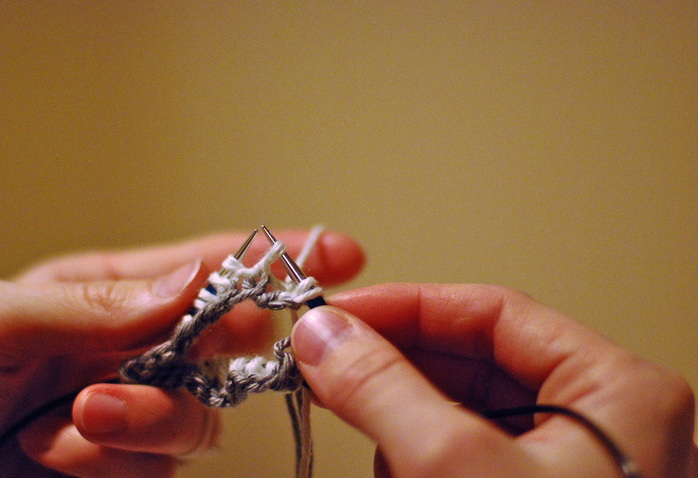 Next, move your working yarn to the back of your work and slip the next stitch, purlwise. 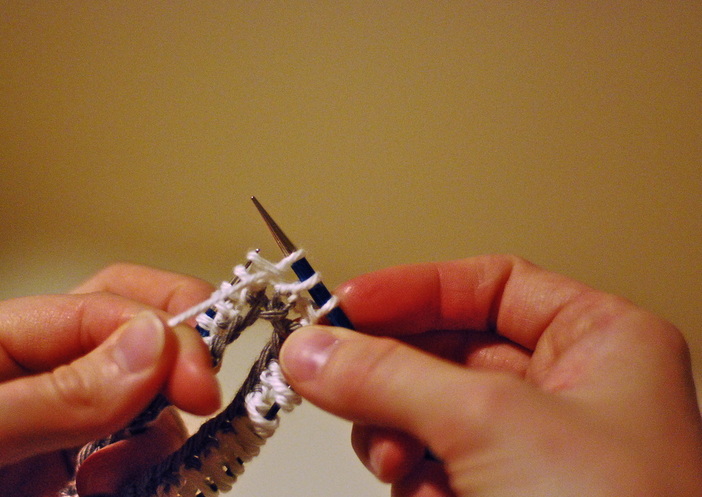 Then, bring your yarn to the front of the work and purl the next stitch in the round. Continue in this manner, Slipping your knit stitches purlwise with the yarn behind them, and purling the purl stitches, until you reach the beginning of the round. Round 3.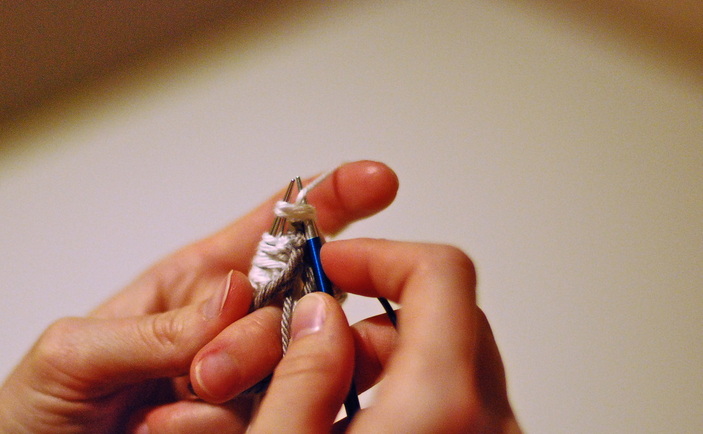 Begin by knitting the first two (previously slipped stitches) together.  Next, slip the purl stitch from your left needle purlwise, with the yarn in front of your work. Knit following stitch. Continue in this manner until you reach the beginning of the round. Round 4.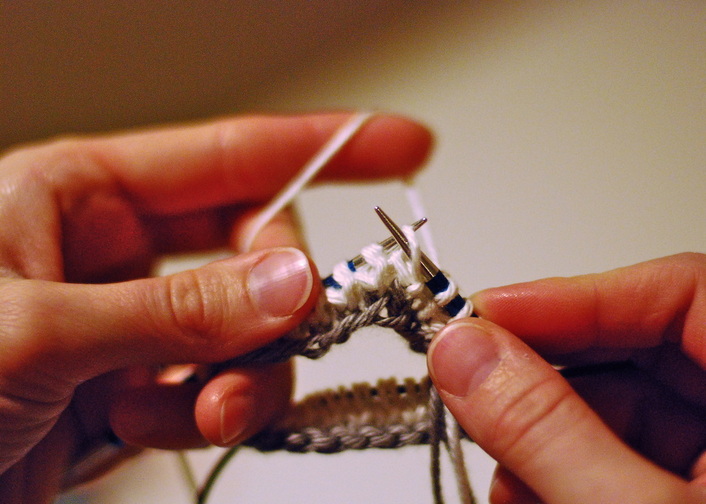 Slip the knit stitch purlwise from your left needle to the right needle with the working yarn held behind the work. 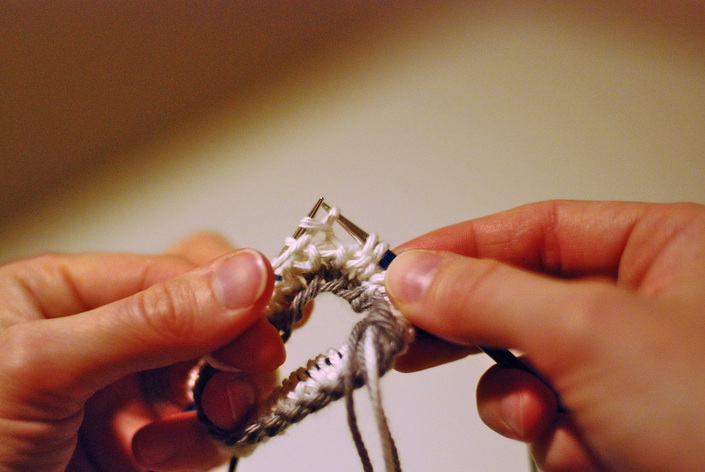 Bring your working yarn to the front of the work and purl the next stitch. Continue these two steps until your reach the beginning of the round. 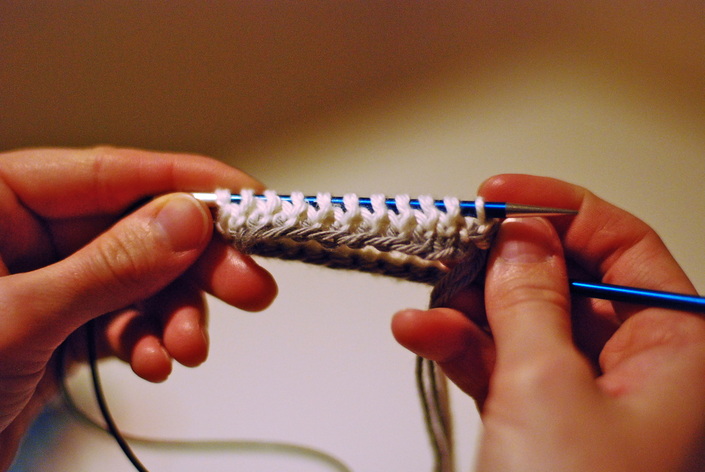 After you complete the fourth round of the pattern, you will have an established 1x1 slipped stitch rib pattern. Now, we will adjust the order of the stitched on our needles in order to set-up a 2x2 rib for the remainder of the cuff. Redistribute Stitches.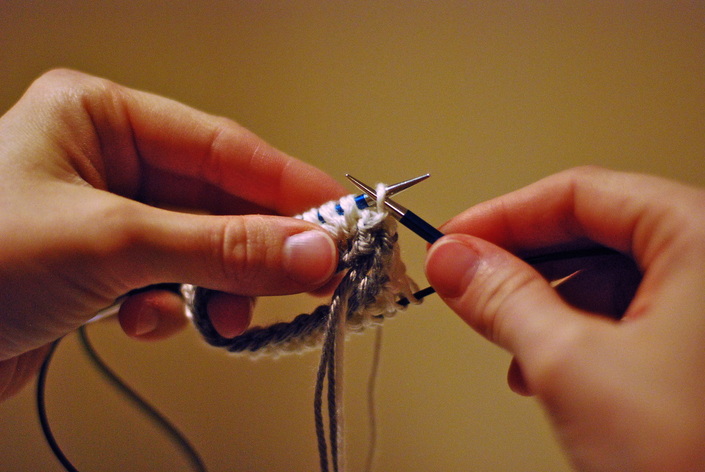 We will now reorder the stitches on our needle. We do this without using our working yarn. Begin by slipping the first 'knit' stitch from your left needle to your right needle. 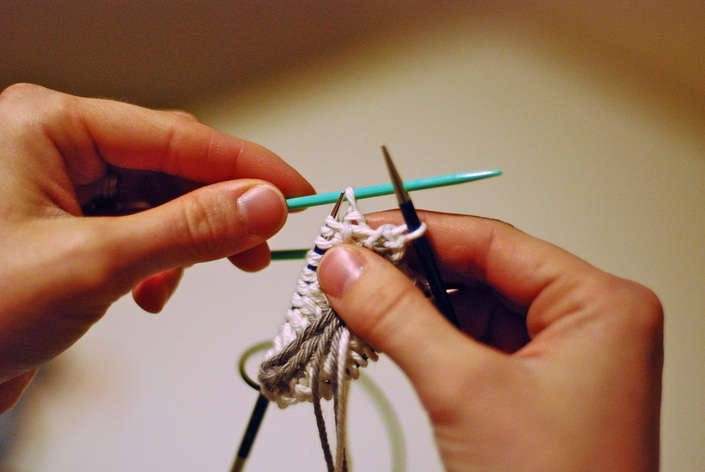 Slip the next, 'purl' stitch onto a cable needle and hold it at the back of your work.  Slip the next, 'knit', stitch from your left needle to your right needle. 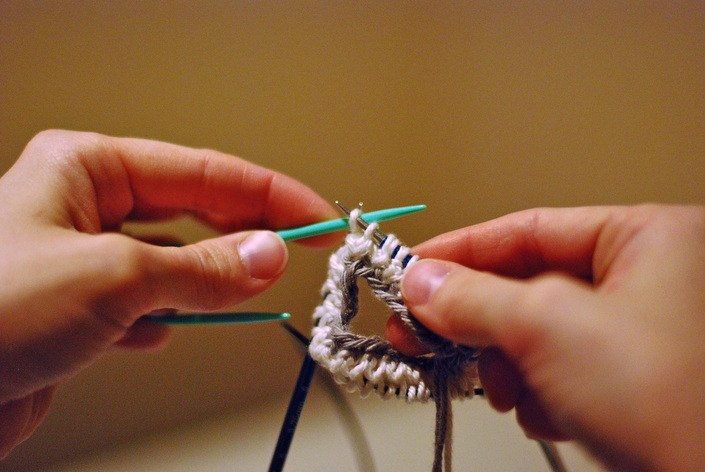 Now, slip the 'purl' stitch from the cable needle to your right needle. 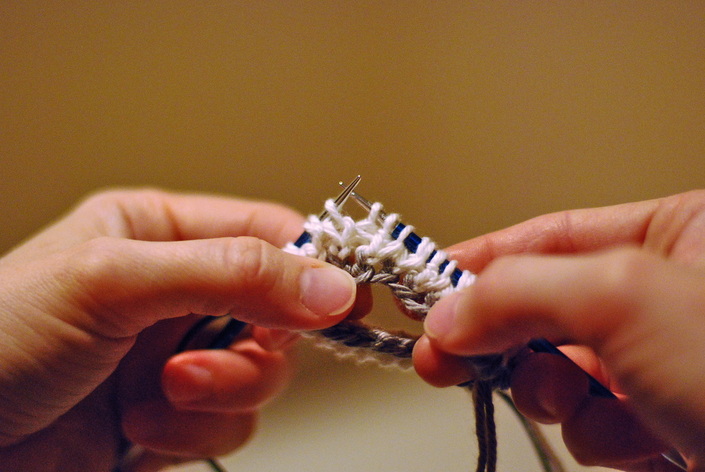 Then, slip the next 'purl' stitch to your right needle. Continue to distribute your stitches until your reach the beginning of the round. Once you finish, the stitches on your needles will be arranged in a 2x2 manner. Round 5. 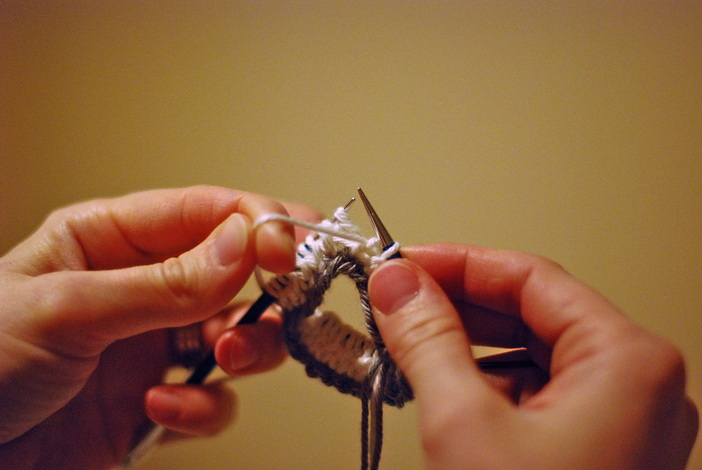 Begin the round by knitting the first two stitches. Then bring your yarn to the front of the work.  With your yarn in front of the work, slip the next two purl stitches to the right needle. Continue to knit 2 and slip 2 in this manner until your reach the beginning of the round. Round 6.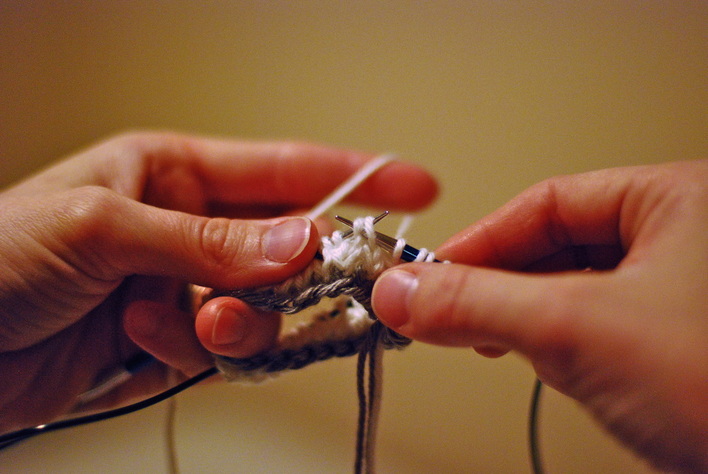 Begin the round by slipping the first two knit stitches to the right needle, purlwise, with your working yarn behind the work. 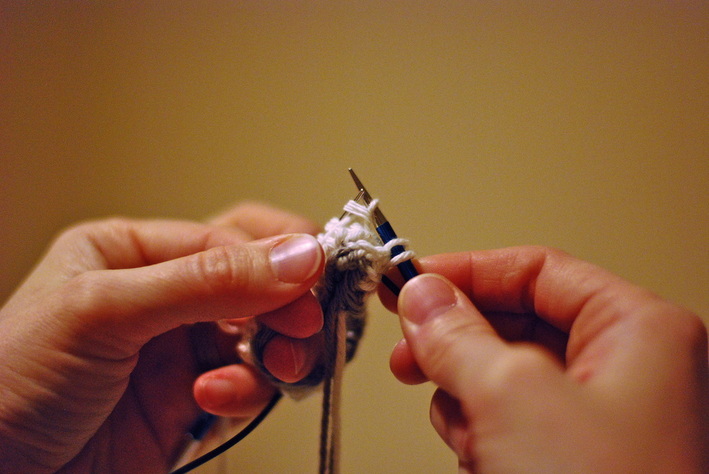 Bring your working yarn to the front of the work and purl the following two stitches. Repeat in this manner until you reach the beginning of the round. 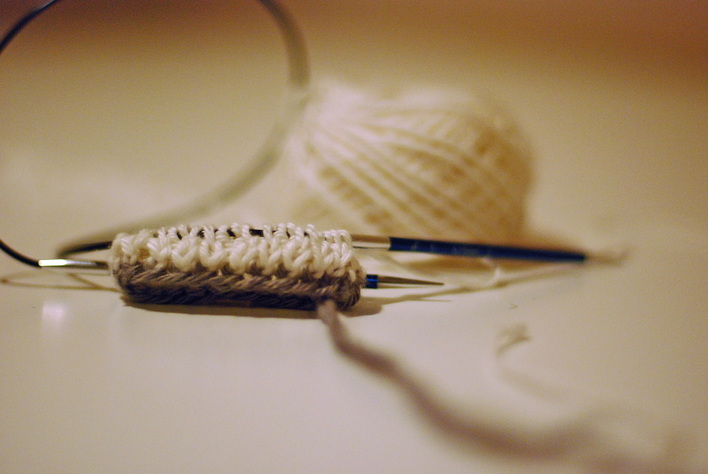 You have now completed your tubular cast-on! From this point forward, you will knit the cuff in 2x2 rib. Before you do, however, remember to change to your Size B needles (suggested US 5). 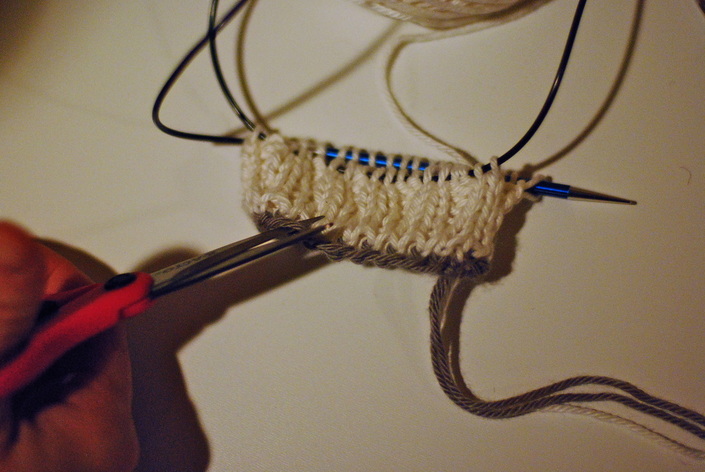 After you knit several rounds of 2x2 ribbing, it is safe to remove your waste yarn cast-on. Being very careful to cut only your waste yarn. Make several cuts along the cast-on edge. 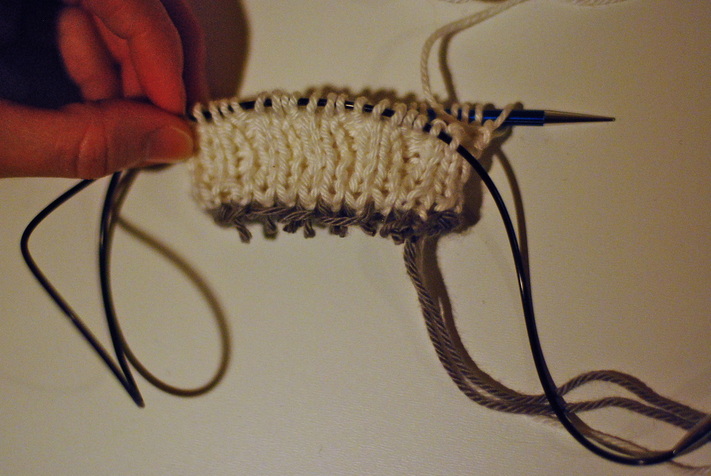 Once the waste yarn is cut, you will be able to easily remove the cast-on edge by tugging on the ends of those pieces. 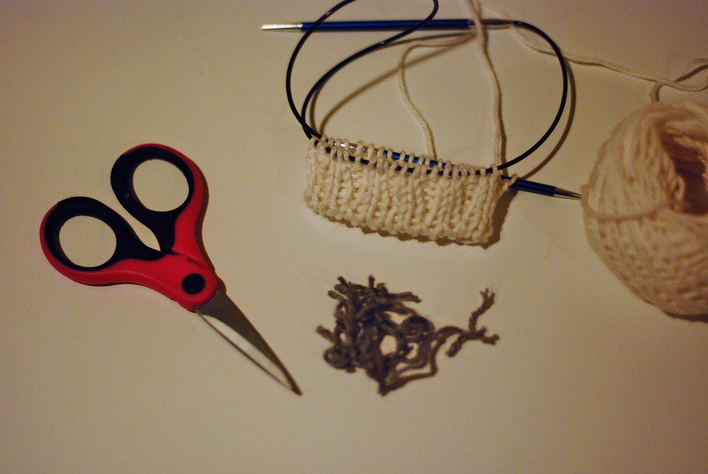 VOILA!  As I mentioned early, the tubular cast-on isn't a requirement. However, it's a fantastic option for a ribbed cuff. You'll note two distinct differences between this cast-on and other knitted cast-on methods. First, there is no apparent cast-on at the edge of the cuff. Instead, you have a rounded, edge that flows almost seamlessly into the rest of the rib. 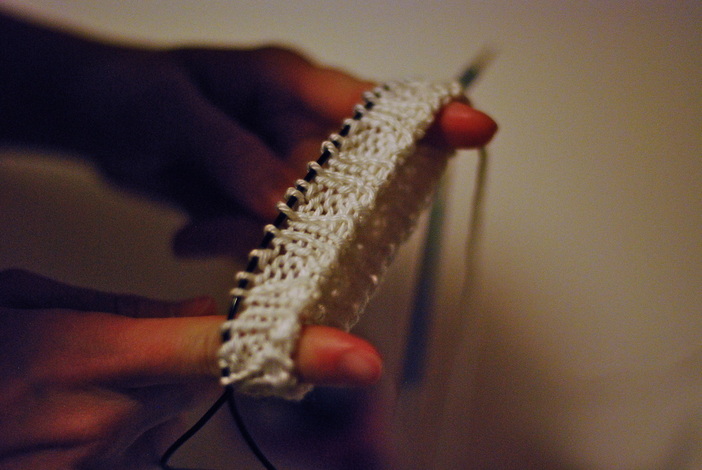 The second major difference you'll notice is the amount of stretch this cast-on allows. As a girl who likes to push-up her sleeves, this is my favorite part.
Alrighty then, Let's get busy! Now that we've cast-on our sleeve, we will continue to rib our cuff for two and three-quarter inches.
8 Comments
Months ago, I told myself that I wasn't going to bring any "unfinished business" with me to the new house. I had planned to finish all outstanding projects prior to packing. I had hopes for a clean slate upon moving. It didn't work out that way. I didn't finish any of them. Not one. As I continue to unpack my supplies, I came across my box of WIPs. And, I was posed with the choice to either A). Find a new area to store all these abandoned endeavors, or B). Finish them. 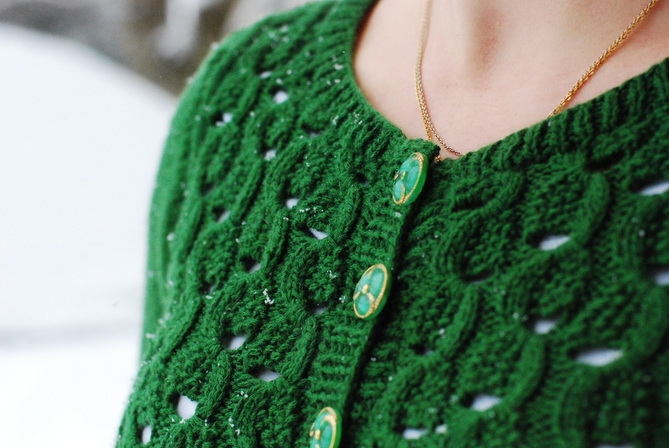
I went with the latter choice. I really need the satisfaction of finishing somethings. Lately, all I've been doing is starting new projects. Everything is in various stages of completion. Truthfully, it's a little chaotic. Most of the projects exiled to my WIP box are close to complete. For instance, this Effervescence Cardigan. Poor thing was banished to the box, because of bad math. 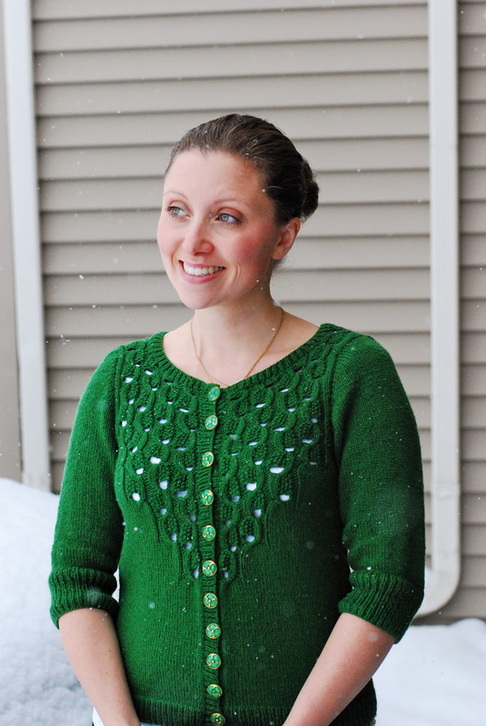
It's (still) SNOWING!
Often, I buy yarn before I have a project in mind. When I come across a sale or have the option to buy a bag, I have a hard time passing. When I'm aiming for a sweater quantities, I try to buy at least 1k yards. It's pretty easy to find a pattern to pair with that amount of yarn. But, it's not always enough to get the job done. Sometimes, a girl has to improvise. I bought the remaining stock of this Louisa Harding Kashmir Baby on a whim during a knit night last winter . Eight Balls; 1144 yards. I arrogantly estimated that I would be able to squeeze-out an Effervescence Cardigan. I didn't crunch any numbers. I avoid math whenever possible. I decided to go with my gut and knit. I felt pretty good about my decision until I reached the sleeves. That's when I got the sinking feeling. I'm sure all you knitters know the one I'm talking about. The, "there's-no-way-I-have-enough" feeling. Instead of stopping to evaluate my yardage situation, I determined I would cheat the pattern and knit 3/4 sleeves instead. I kept knitting. Long story short, my cheat provided me the perfect amount of yarn to knit mid-forearm length sleeves for my sweater- And, absolutely no leftovers for the neckline and button band. As you can imagine, I felt pretty defeated. Like a gambler whose lucky streak ended on an all-in hand. In that moment, I didn't have it in me to RIP and re-knit. 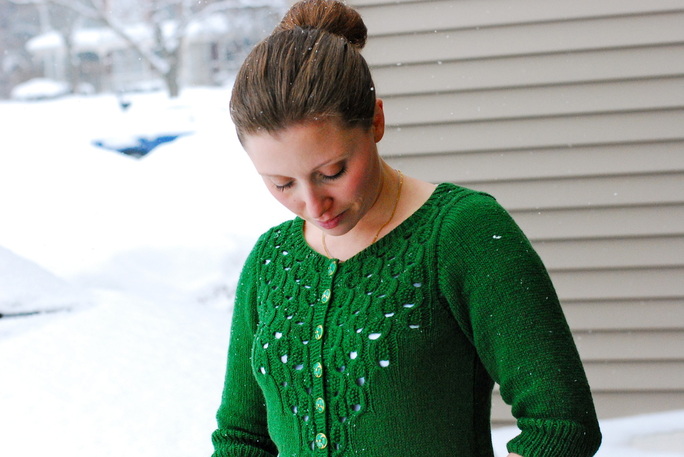
A smarter knitter would have known from the start that she was playing a losing hand. The largest size of this pattern uses 60% more yarn than the smallest size (1086 yards /1810 yards= .6 ). There are six patterns sizes spanning between the largest and the smallest sweater sizes. Therefore, we can reasonably assume that each size between the smallest and largest sweater sizes requires approximately 10% more yarn (60% / 6 sizes) than the size preceding it. The "37 sweater I chose to knit reasonably requires 10% more yarn than the "33 sweater, which we are told uses 1086 yards. SO, I should have expected to need ~1195 yards (51 yards less than what I had.. ARGH!). I would have spared myself a lot of headaches had I started from this point instead of working backwards. 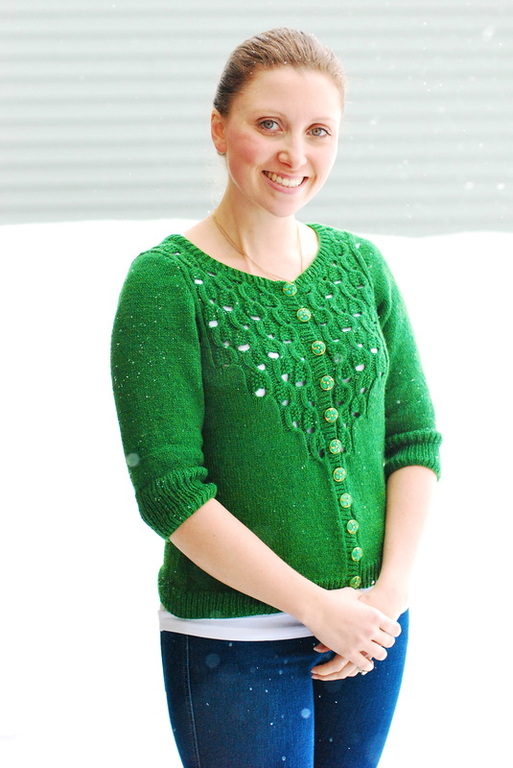
When I reached in and rescued this sweater from the WIP box, I knew I needed a new plan of attack. I started with the neck and button band. Pretty easy stuff. Then, I took my remaining yarn and divided evenly using my gram scale. I use my scale ALL THE TIME for weighing yarn. They're very inexpensive and a true lifesaver for figuring yardage on leftover balls of yarn or in instances like this. Once I had my yarn portioned, I reworked my sleeves from the top-down. I wanted to maximize the length of my sleeves, so I used Tasha's tutorial for a seamless set-in sleeve and knit until I ran out of yarn. It was a fantastic option for the predicament I was in. I do think I could have decreased a bit quicker to gain an inch or so, but overall, I'm pleased with the way things turned out. 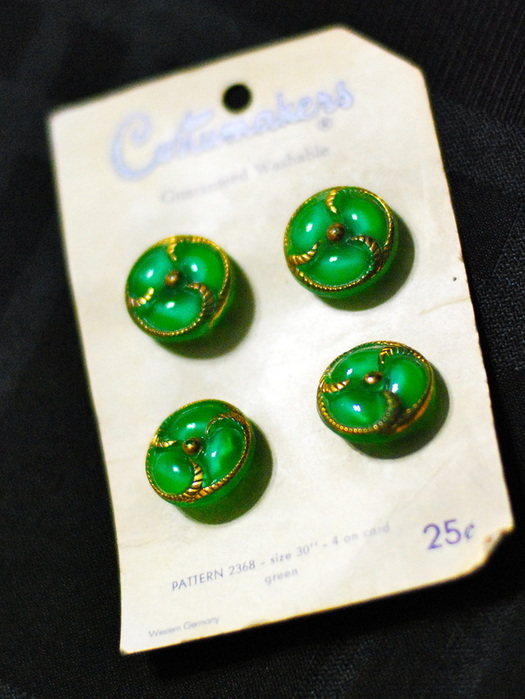
I feel like I regained a little bit of the luck that I'd lost earlier in this project. Because, after I'd finished knitting, I found some vintage buttons from my stash that are a perfect match to pair with my new sweater. I think they are from the 1940's, but I can't be sure. They're some form of primitive plastic but look like glass. They're manufactured by Costumakers, and the bottom left corner indicates that they're from Western Germany. If you've got any good button resources, I'd love to know more about them.
The moral of this story, math is a friend, not a foe. What are your tricks for beating the odds against yardage shortages? Are you the betting type, or do you play it safe? Almost equally important to choosing the correct pattern size is choosing the correct type of yarn to knit with. When you consult your pattern, you'll note that the author tells you, very specifically, that you need worsted weight wool yarn. This description provides two important pieces of information: yarn weight and fiber content. Let's start with fiber content. The sample shown on the Channel Cardigan Pattern Page is knit from Brooklyn Tweed Shelter, a 100% American Targhee-Columbia wool. While it's not essential to knit this sweater using the same yarn as the author, it is important to choose a yarn with similar properties to the type of yarn the author has chosen in order to achieve a similar result. I don't know a knitter who doesn't love alpaca, but choosing alpaca yarn for a project like this wouldn't be a great yarn choice. Why? Well, to start, the Channel Cardigan is a heavily textured design that requires good stitch definition in order to accentuate the details of the patterns incorporated. Fabric knit from alpaca has a halo, which will "swallow" all the details of your stitch patterns. Also, this pattern, though knit with positive ease, has a fair amount of structure, and fabric knit from alpaca doesn't. In fact, it produces the opposite effect- drape. For those of you who sew, it would be like expecting the same result from garments sewn using woven cotton and charmeuse. Many number of other fibers are equally inappropriate for this design. (NOTE: Clara Parkes' The Knitter's Book of Wool and The Knitter's Book of Yarn are wonderful resources for those interested in learning about fiber characteristics.) As a general rule of thumb, the fuzzier/fluffier a yarn is, the poorer the stitch definition will be. And, inversely, smooth, tightly spun yarns will produce better stitch definition. For optimal pattern enhancement, I recommend sticking with either a 100% wool yarn or a blend that is predominantly wool. 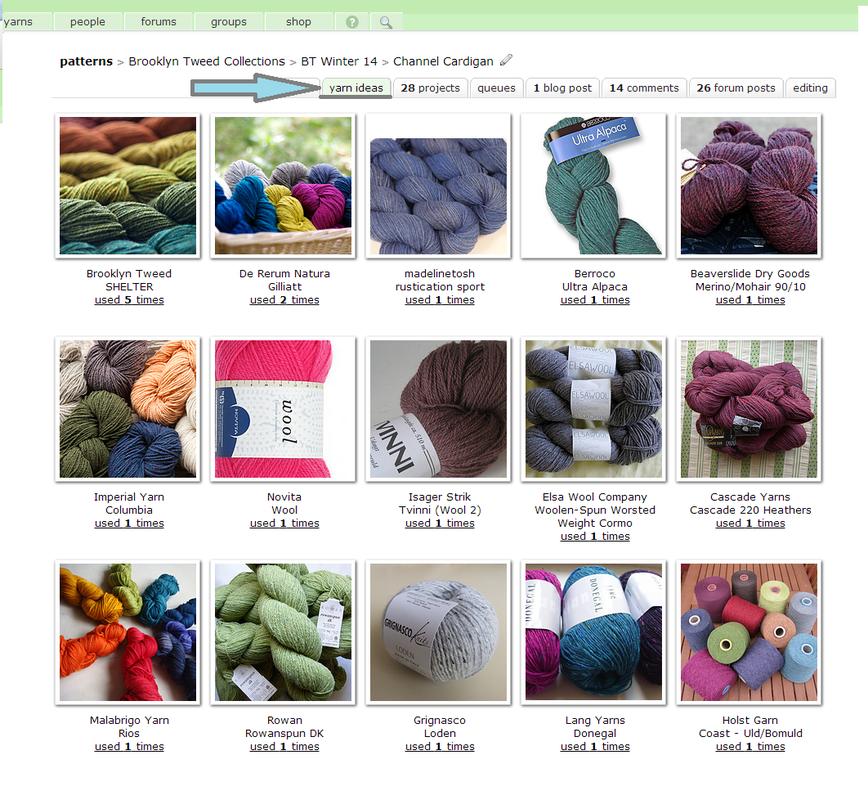
One way to help make a decision about which variety of yarn to use is to look and see which types of yarn other knitters have used and the results they produced using those varieties. To do this select the "yarn ideas" tab from the Channel Cardigan pattern page on Ravelry. You can then see how these yarns work with the Channel Cardigan pattern by following the "used 'x' times" link below the yarn. Another way to find yarn is using the filters on Ravelry's yarn search. Using the fiber filter for wool and the weight filter for worsted yarns, you can see more than 4,000 different types of wool and wool blend yarn for consideration. You can arrange the search results to see which yarns have been used on the most projects, have the highest rating, or are the best match for the filters you applied. You can also view projects knit with each yarn to determine whether or not that yarn produces a fabric that would be well suited to the pattern. Of course, nothing beats getting up-close-and-personal with yarns at your LYS. Many shops have swatches knit and on display throughout the store to help shoppers get a better understanding for the fabrics each yarn produces. Don't be afraid to touch. Handling swatches will help you understand the properties of the fabric: does it lay nicely over contours? Does it have nice rebound? How is the stitch definition? Etc... Now, on to our second piece of information, yarn weight. 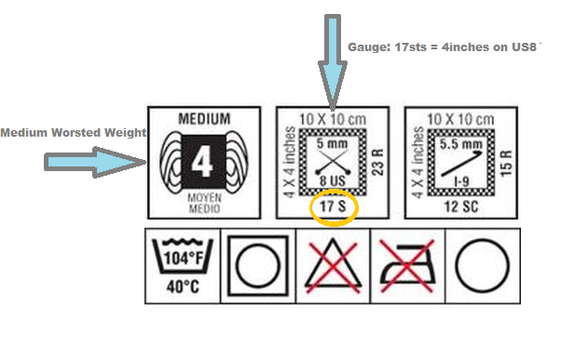
While you are shopping for yarn, it is important to realize that not all worsted weight yarns are created equally. Yarn weight is a standardized system created as a guideline. And, as with most systems that generalize or standardize, there is typically some level of standard deviation between manufacturers. In order to better understand your specific yarn, you can refer to the label for gauge information.
Many yarn labels will provide you with visual gauge information, similar to that shown in the image above. Using these symbols, we know that the yarn packaged within the wrapper is a Medium worsted yarn. The symbol '4' stands as representation for this weight category, and it is a quick reference. The next symbol tells us that we should be able to expect a gauge of 17sts. over 4 inches (or 4.25 sts. per inch) when knitting with a US 8 needle. Shelter has gauge of: 18 sts = 4 inches on US 8 needle (or 4.5 sts. per inch). If you plan to substitute a medium weight worsted yarn in place of Shelter, it is VERY IMPORTANT to accommodate for this disparity in gauge. Over the span of an entire sweater, those fractions of a stitch add up and make a drastic difference. Additional factors, including your personal knitting tension, will play a role in the gauge you achieve from a particular yarn. The absolute best way to know how your yarn will behave with the pattern is to SWATCH! Which, is exactly what we'll do next week! As a final note, when purchasing yarn for a pattern, it is ALWAYS better to err on the side of caution (ask me how I know). Too much yarn is better than not enough! Materials List:
Before we start knitting, we need to gather all the materials we'll require to knit our sweaters. The first thing you may notice is the variance in yardage required to complete the different sizes. In order to know how much yarn to purchase, you must first decide which size sweater you plan to knit. Choosing the correct size sweater is the most crucial decision towards a successfully executed sweater. After all, we want to knit sweaters that fit! 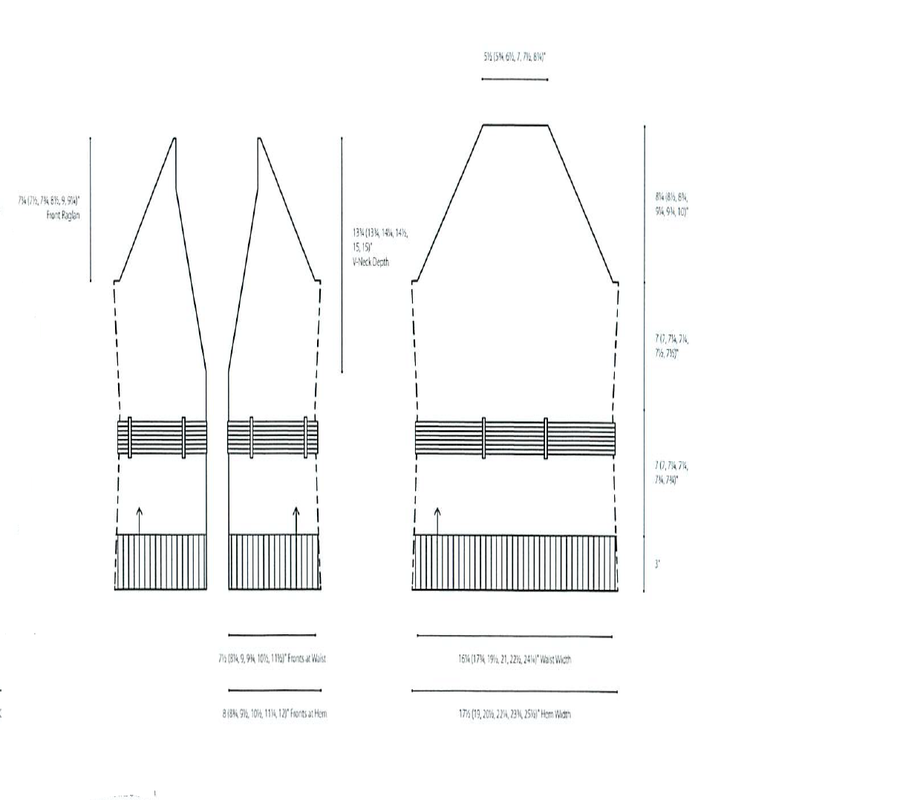 There are six sizing options: 35¾ (38¾, 42, 45¼, 48½, 51¾)" circumference at the bust (buttoned). Additional size information can be determined using the sweater schematics on the third page of your pattern. These diagrams provide finished (post blocking) measurements for the sweater. Using these charts can be very helpful in customizing the fit of your garment. For instance, if you are pear shaped and need a sweater that provides ample room through the hip, you may decide to blend sizes by using stitch counts for a larger size at the bottom of your sweater and decreasing to a stitch count for a smaller size at the top/bust. If you are tall/short you can use these diagram to make adjustments to the total length of your completed sweater or adjust the position of the waistline to accommodate your figure. The author provides us with very valuable information with regard to sizing in this design. He tells us that the sweater is designed to fit with 4-5 inches of positive ease. Further, we're told that the model pictured is wearing the "38 3/4 size, with approximately "4 3/4 of positive ease. What does this mean? Positive ease means that the sweater will be larger than your actual body measurements. Therefore, if you want a sweater that fits in a manner similar to the sweater worn by the model, you should add between 4 and 5 inches to your bust measurement prior to choosing the size you plan to knit. Similarly, if you prefer a sweater that fits with zero ease, you should choose the size that corresponds with your actual body measurements. This first decision, size, will affect your finished garment greatly, so be mindful and choose the correct size to achieve the finished product you desire!  |
    Archives
March 2017
|
